How To Map
Summary
- Tutorial
- Basics
- Floor Tab
- Ceiling Tab
- Wall Tab
- Columns & Prop Tab
- Wall's Prop Tab
- Field Tab
- Mob Tab
- Item Tab
- Edit Cells Tab
- Level Tab
- Dungeon Tab
- Triggers & Targets
Tutorial :
Launch the game, then click on the "Map Editor" button. You'll see then a screen like this:
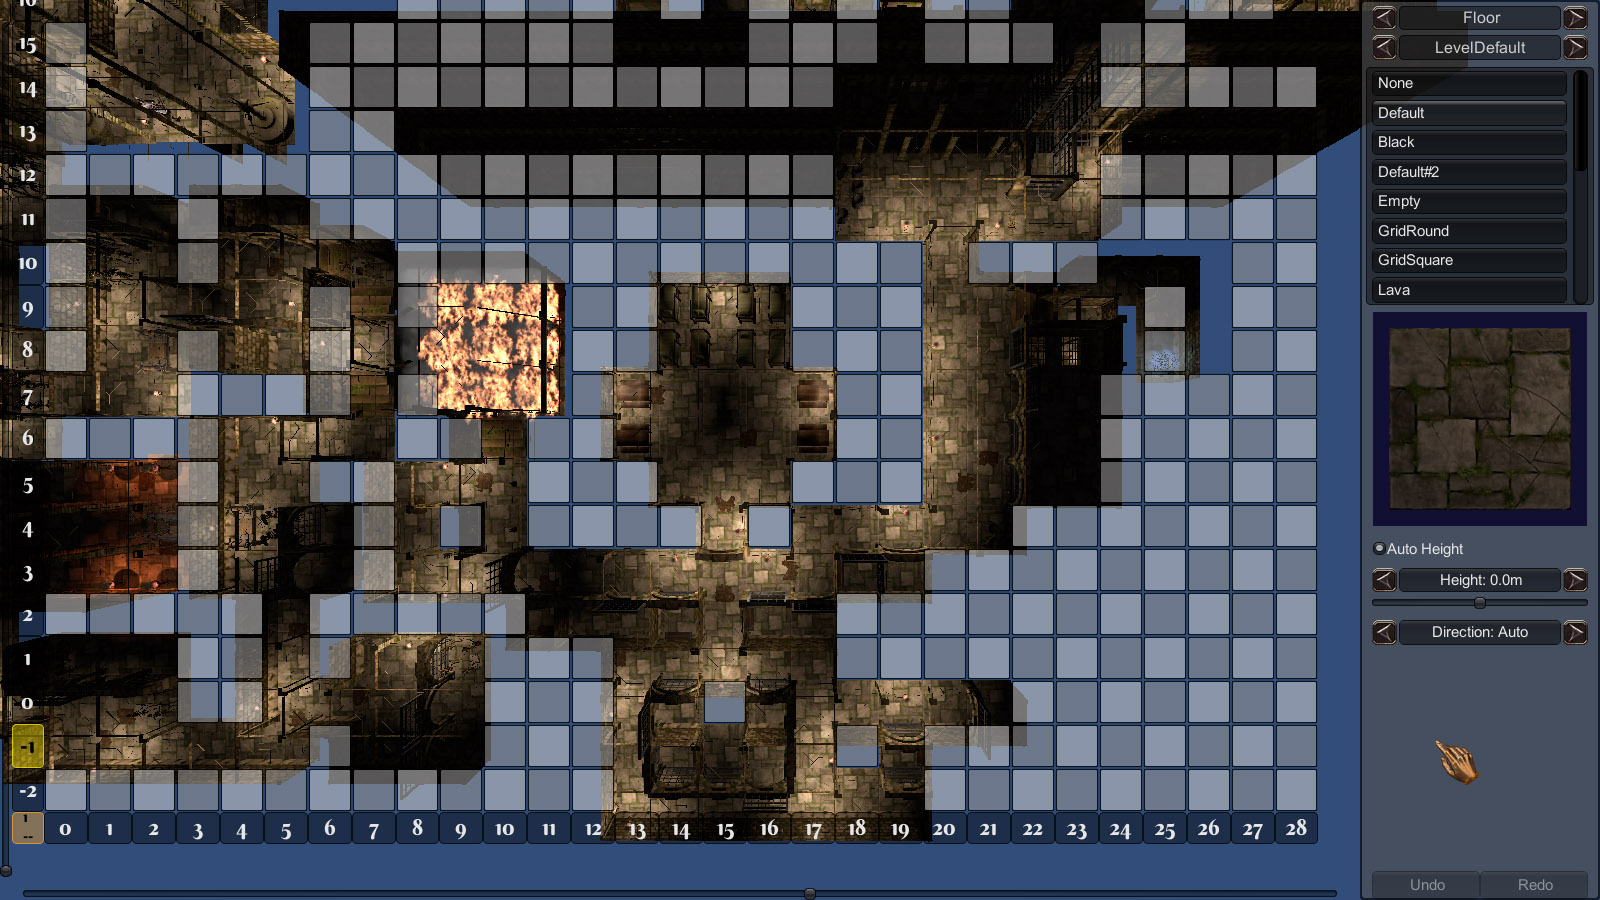
It's the 1st level of the game. Later, you can check it in detail to see how everything is done.
But for now, click and hold on "Floor" on top right of the screen, and select "Dungeon".
In the new tab, click on "New Dungeon".
Give a name to your new dungeon under "Dungeon Name", and give a name for its save folder under "Dungeon File".
Click and hold on "Dungeon" on top right, and select "Floor".
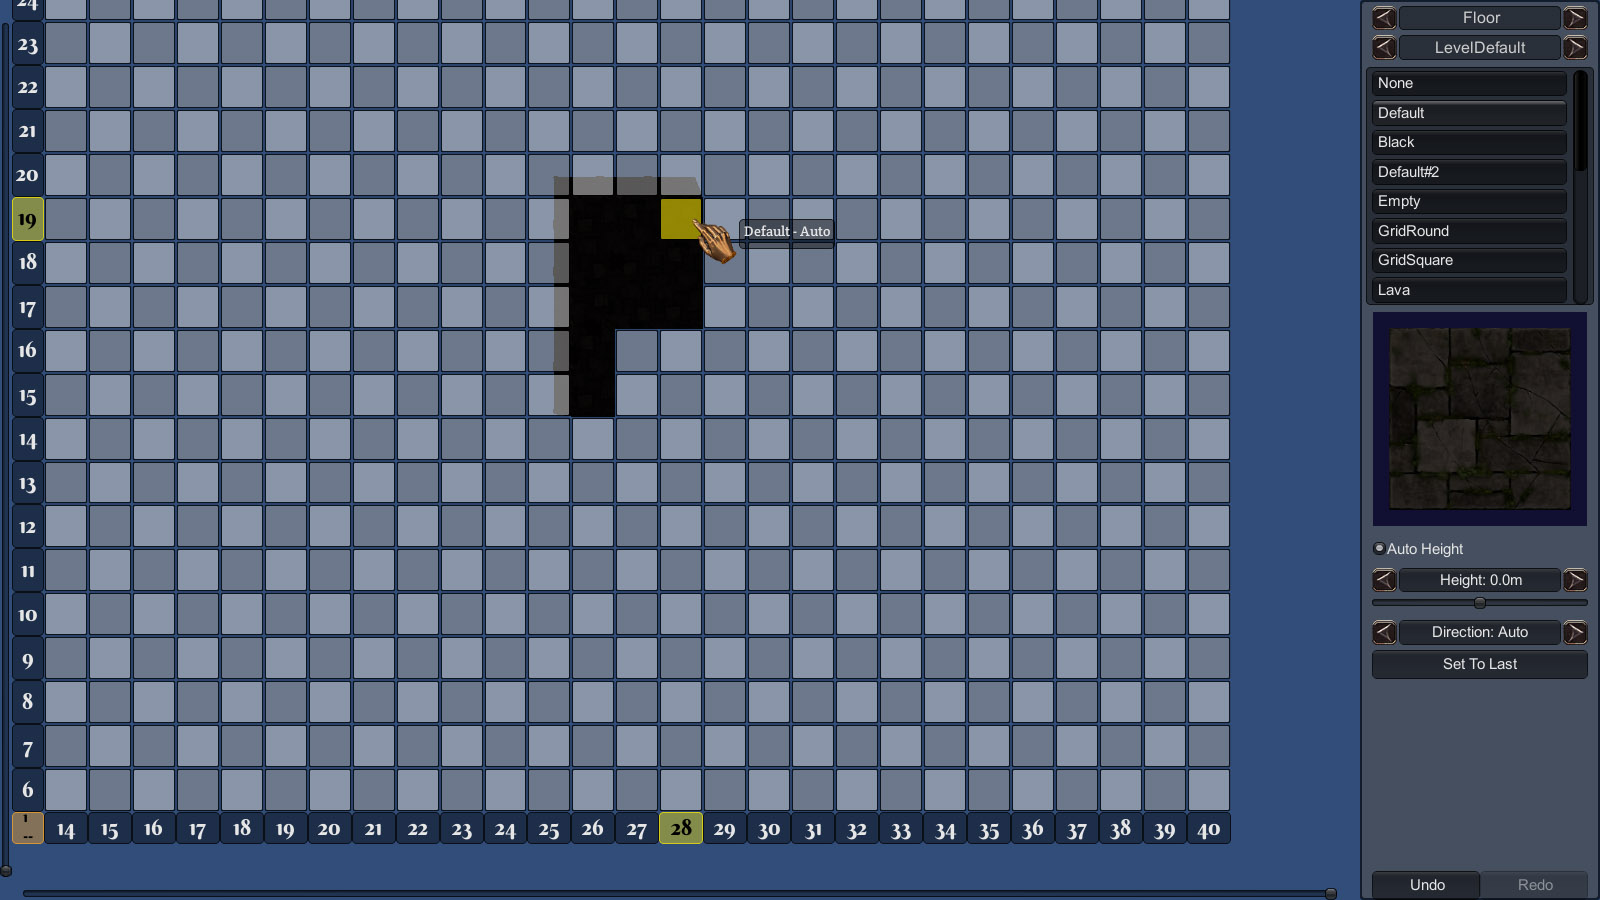
Left-click a cell to fill it with the default floor. The walls and ceiling are automatically set.
Right-click if you want to delete any cell.
Add a few cells, till you have something like this:
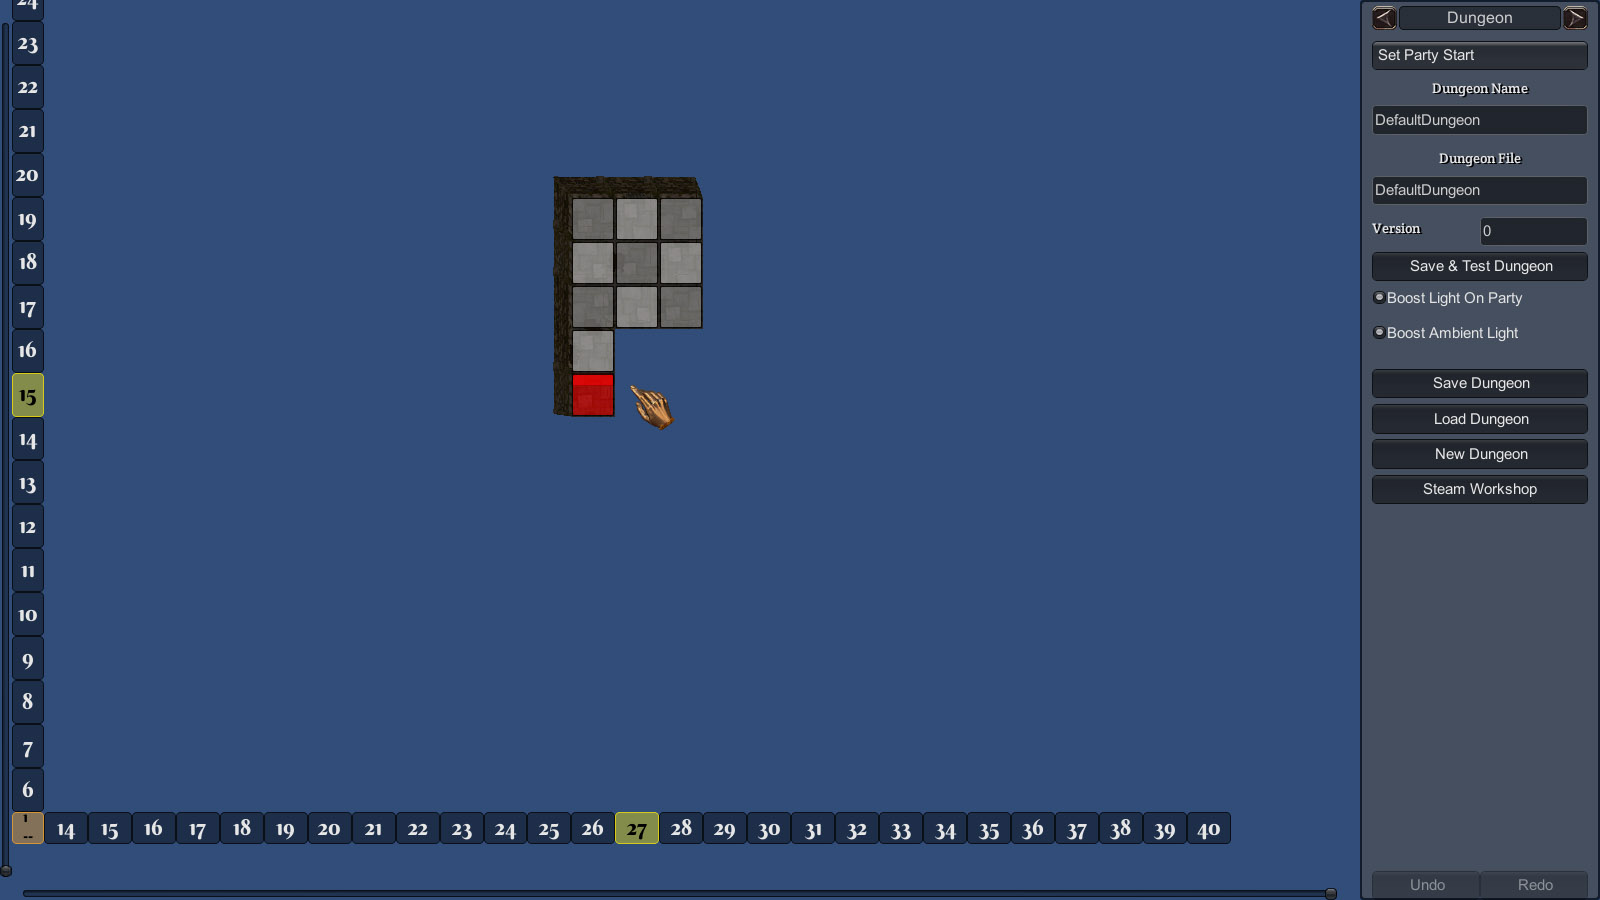
Click and hold on "Floor" and select "Dungeon" again.
Activate "Boost Light on Party" and "Boost Ambient Light". When you do the 2nd one, you'll notice the existing cells get brighter. This mode is meant to allow to see something in the Dungeon when you still didn't put any light in it, so you can check the layout easily.
Now, middle-click in the center of your room. This will toggle the camera to the 3D view.
There you can left-click to toggle the Light on Party (which is on the camera in the Editor), and right-click to toggle the Ambient Light.
Scroll up & down the mouse wheel to zoom in/out on the focused point and lower/raise the move speed.
Use the numpad keys 4, 5, 6 & 8 to move around, and numpad - & + to move up & down.
Middle-click again to go back to the edition view.
If you have deleted the 1st cell you had created, you'll have to set the starting point by clicking a direction on any cell. Once done correctly, the cell will turn red when you move the mouse away of it, with the starting direction in plain red.
Once all set, click on "Save & Test Dungeon" (or press the F8 key from anywhere in the editor).
Select "Default Party", and play your 1st Dungeon ! :-)
Press F9 to come back to editing mode.
Congratulation, you finished this mini-tutorial ! You can either test out what each tab does (ie: ceiling, walls, etc.) or read on to learn detailed usage of everything.
Basics :
File Location :
To locate your Dungeon files, go to the Main Menu, then Loading Game, then click on "Show Data Folder". Your Dungeon folder will be in the "Maps" folder. Its name is the one you entered under "Dungeon File" in the "Dungeon" tab.
Backup :
A lot of dangerous operations (for example, creating a new dungeon) are done without confirmation, so be a bit careful.
However, the editor automatically rolls 5 backups every 5 minutes, and 5 other backups every 30 minutes, so if something gets really wrong, you should be able to restore a previous version of your dungeon.
Backup folder is alongside your Dungeon folder, with the same name but with the extension ".Bak".
General Editing Rules :
Most of the times, you will be able to do the following actions ; the exact behavior depends of the context.
Left-click to apply the currently selected asset or function.
Right-click to delete the element under the mouse, or replace it by the default asset.
Right-click will also close the "Select Target" screen.
Undo :
Most operations can be undone & redone using the undo/redo buttons on bottom right of the screen.
Undo queue is discarded when you test the Dungeon.
Editor keeps track of the 1000 last changed cells.
Arrow Sliders :
When you can change a value with a slider and arrows, holding the Shift key while clicking the arrows will change the value by 10 fold.
Copy :
While holding the Shift key, right-click on an element (ie: a floor, a wall, etc...) to copy its settings. This will also select this element for the "Set To Last" button that appears in some tabs.
Camera :
Middle-click to toggle between the editing view and the 3D view.
Middle-click and hold then move to scroll the map view.
Click and hold in the asset view window to rotate the currently selected asset. While keeping the left button pressed, use the scroll wheel to zoom in & out.
Automatic Randomization :
Floors whose name starts by "Default", as well as Ceilings, Wall, Column and Prop set to "Auto" will be randomly changed to bring variation into the dungeon.
So if you want an element to never change (it can be very important in some case), be sure to manually set it to "None" for the columns & props, or "Default" for the walls & ceilings, according to the need.
LevelDefault :
By default, the 1st bar value under the Tab bar is "LevelDefault". It means the created elements will use the asset list from the environment set in the "Level" tab. But if you want to use a specific element from another environment, you can change this value to the wanted environment.
Brushes :
By default, the "Normal Brush" is selected in the 2nd bar under the Tab bar. It lets you place elements 1 by 1.
You can however select other kinds of brush. The "Brush Smart" will change only the elements already set in a cell and that match the selected asset ; eg: the "Brush Smart" won't change a door if you selected a normal wall, and vice versa. The "Brush All" will change all elements at once in the cell.
Warning : some brushes aren't implemented for some elements ; in that case, nothing will happen when you click in the center square of the cell.
Selecting a custom Dungeon to play :
Once you have at least 1 additional Dungeon, you'll get a "Select Dungeon" button in the Main Menu of the game, which will let you play that Dungeon without launching it from the Map Editor.
Connecting 2 Levels :
Levels are automatically connected to each other when 1 cell in one level is next to another cell in another level.
You can easily see 2 levels at once by settings the "See Other Level" in the "Level" tab.
You can't have any wall set on the connection between 2 levels. So if you need to put a door or anything else, set it fully in 1 level, not exactly between 2.
Testing :
If you want to see map coordinates, pass through doors, and not fight monsters, then activate the DevMode and GhostMode ; to do so :
- Run the game, go to Load menu, click on Show Data Folder
- Close game, open Dungeon.ini and there change this line, under [Game], from :
AllowDev = 0
to :
AllowDev = 1
(or add it, if it's not there) - Launch the game, and now you can then turn on DevMode ( = debug info) and GhostMode ( = monsters cannot see you and you can pass through doors and cannot die) in Options -> Game Options.
Light Bleeding :
Light bleeding is a feature of the engine, which has advantages and disadvantages ; it's better to never put a torch at less than 3 meters of a zone that has low lighting because the walls won't stop the light 100%.
Floor Tab :
Here you can create the map cells and set their floor.
Select the floor you want in the top right list.
If "Auto Height" is activated, the editor will align the floor height to the neighboring cells.
If "Auto Height" is disabled or if there's no cell around, the "Height" value will be used instead.
After you have set a floor, or shift + right-clicked one, you can change the parameters and then click "Set To Last" to assign them to that floor.
If the floor is flat, you can change its orientation by changing "Direction". The floors whose name starts by "Default" and have their direction set to "Auto" will be automatically rotated to bring variation.
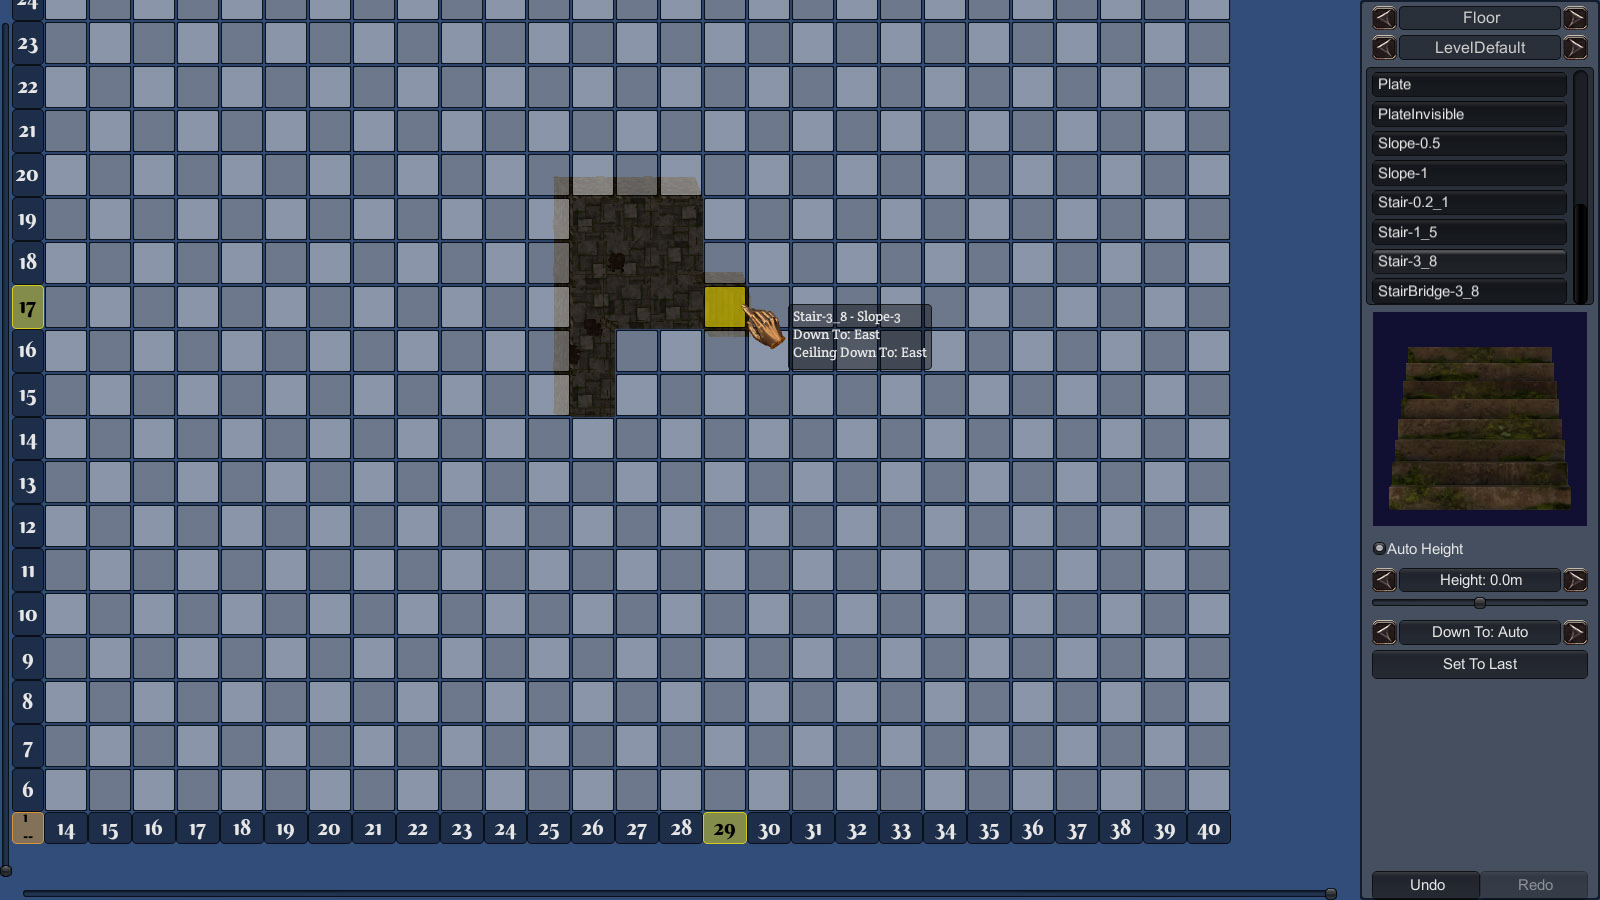
If the floor is sloped (ie: stairs or straight slope), you can define in what direction the slope is going down, or let the editor finds by itself, by setting "Down To".
If you select a plate, you can define in what direction the party or Mobs must be standing to activate it by changing "Triggered". When you place it, you'll be asked to select its target(s). More info about this in the Triggers & Targets section.
If you select a trap door (name = "PitSa"), you can define what value will make this trap door close by changing "Trigger Value". More info about this in the Triggers & Targets section. If you want the trap door to be closed at start, assign it twice.
When creating a new cell, the ceiling from the Ceiling tab will be used. When changing the floor of an existing cell, the existing ceiling will be left unchanged, so if you need to change the ceiling as well, delete the cell 1st by right-clicking it.
Ceiling Tab :
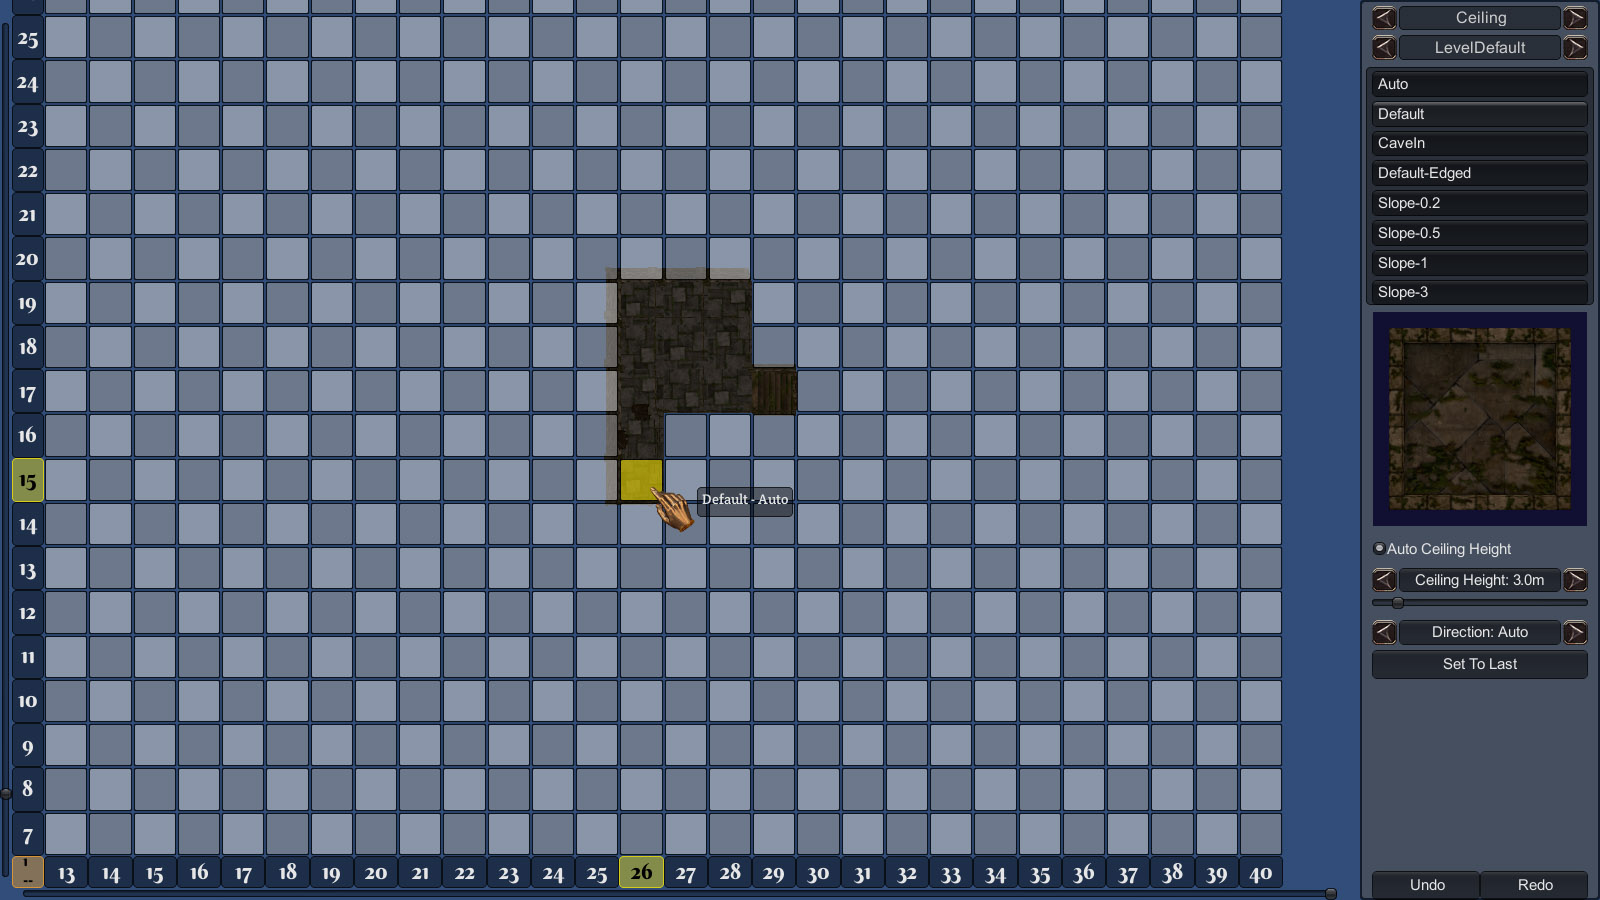
Here you can create the map cells and set their ceiling.
Select the ceiling you want in the top right list.
If you choose "Auto", the editor will select a sloped ceiling to match the slope of the floor when you create a new cell using a sloped floor.
If "Auto Ceiling Height" is activated, the editor will align the ceiling height to the neighbouring cells.
If "Auto Ceiling Height" is disabled or if there's no cell around, the "Ceiling Height" value will be used instead.
After you have set a ceiling, or shift + right-clicked one, you can change the parameters and then click "Set To Last" to assign them to that ceiling.
If the ceiling is flat, you can change its orientation by changing "Direction". The ceilings whose name starts by "Default" and have their direction set to "Auto" will be automatically rotated to bring variation.
If the ceiling is sloped, you can define in what direction the slope is going down, or let the editor finds by itself, by setting "Down To".
When creating a new cell, the floor from the Floor tab will be used. When changing the ceiling of an existing cell, the existing floor will be left unchanged, so if you need to change the floor as well, delete the cell 1st by right-clicking it.
Wall Tab :
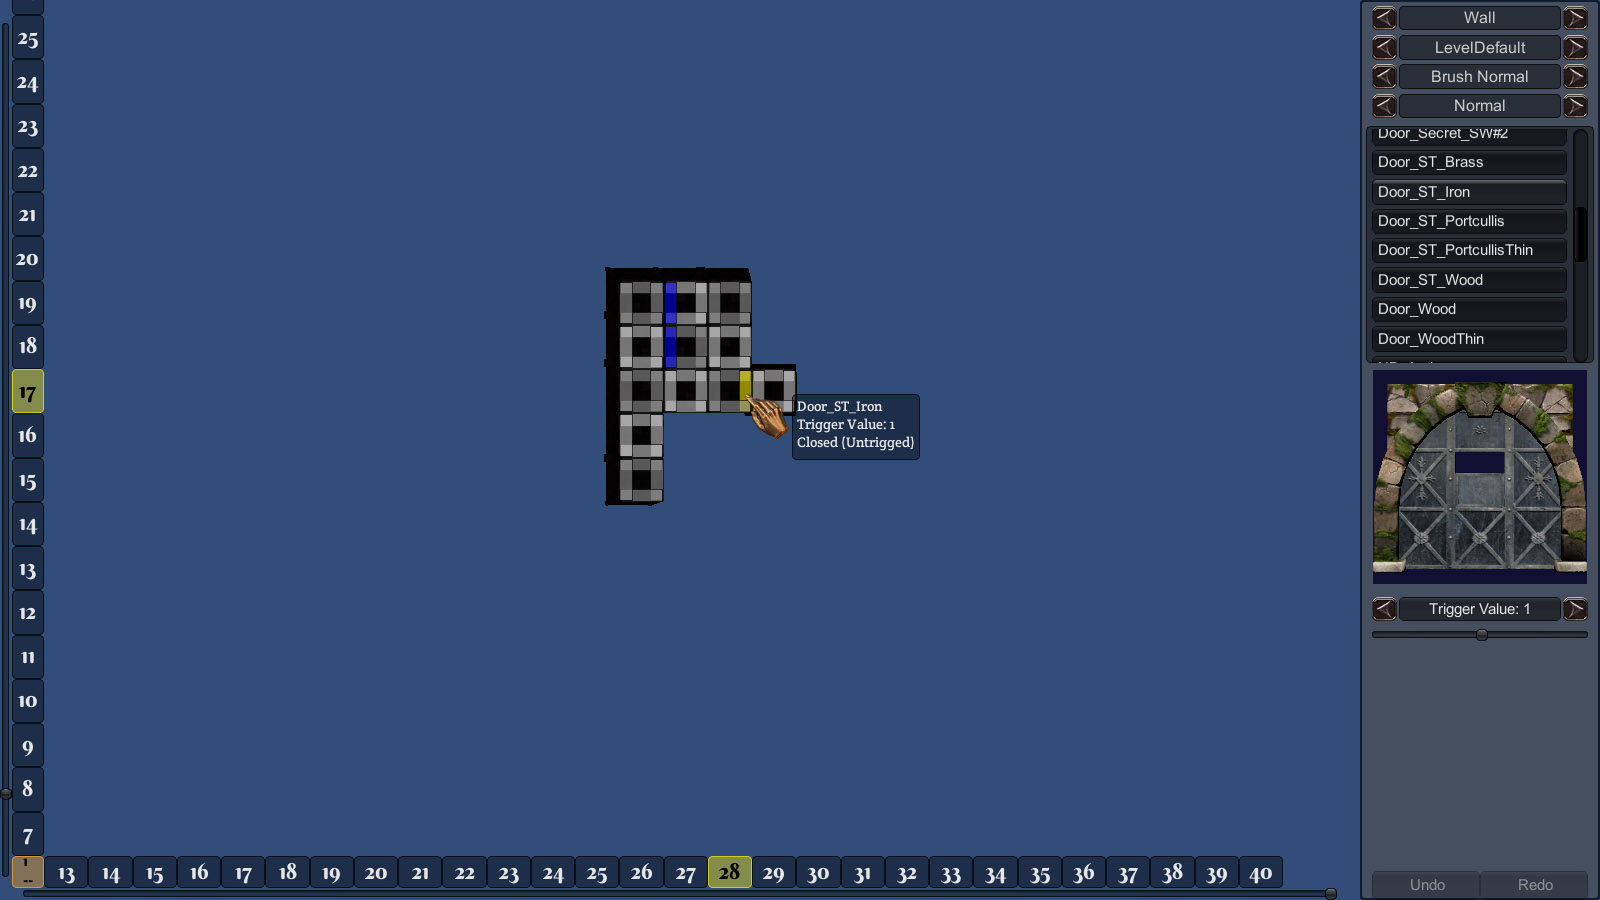
Here you can change the walls for each cell.
The walls of a new cell are always set to "Auto", which means there is no wall between 2 adjacent cells if they share the same height, even if just partly.
If you select a door, you can define what value will make this door open by changing "Trigger Value". More info about this in the Triggers & Targets section. If you want the door to be open at start, assign it twice.
If you select a secret door which includes a switch, then when you place it, you'll be asked to select its target(s). More info about this in the Triggers & Targets section.
The 3rd bar under the Tab bar lets you change the walls that appear under and above the center part when 2 cells are different heights for their floors and/or ceilings.
Walls whose name starts by "NB_" don't block the party (ie: "Non Blocking").
Walls whose name contains "ST_" are See Through.
Walls whose name contains "_BT" let the party Battle Through them.
Walls whose name starts by "TZ_" are trigger zone:
- You can define what item will trigger them in the Item tab
- "Trigger Value" defines how many of this item must be present on the wall for it to trigger
- If you active "Other Items Prevent Triggering" then the wall won't trigger if any other kind of item is present in addition of the wanted item
- When you place such kind of wall, you'll be asked to select its target(s). More info about this in the Triggers & Targets section
Columns & Prop Tab :
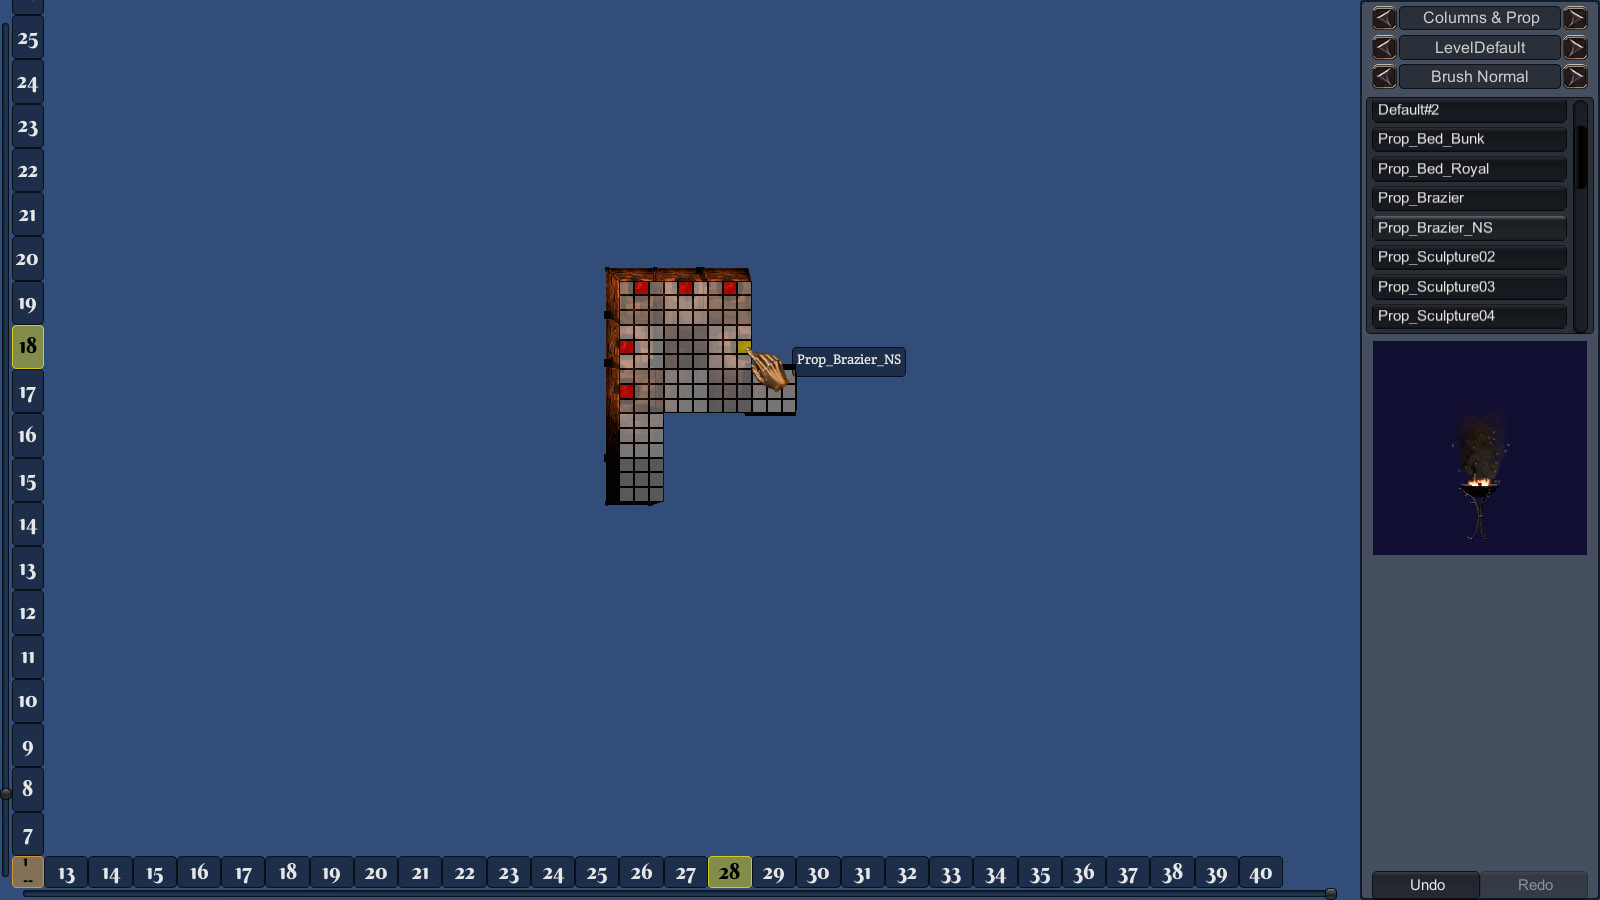
Here you can define specific columns or props.
The game engine will put column only between 2 different walls, so if you want columns between 2 identical walls, you'll have to add them manually.
Assets whose name starts by "Prop_" are props. "PropCLG_" are for props that will be aligned to the ceiling height. "PropNB_" are for props that won't block the party.
"Prop_Brazier_NS" is identical to "Prop_Brazier" except it casts No Shadow, which means you can put a lot of them in the same room, it won't bring performance issue. If you have only 3 or 4, you can use the normal version if you prefer it.
If you put a prop in a corner where a column was needed, visual glitch might occur.
Wall's Prop Tab :
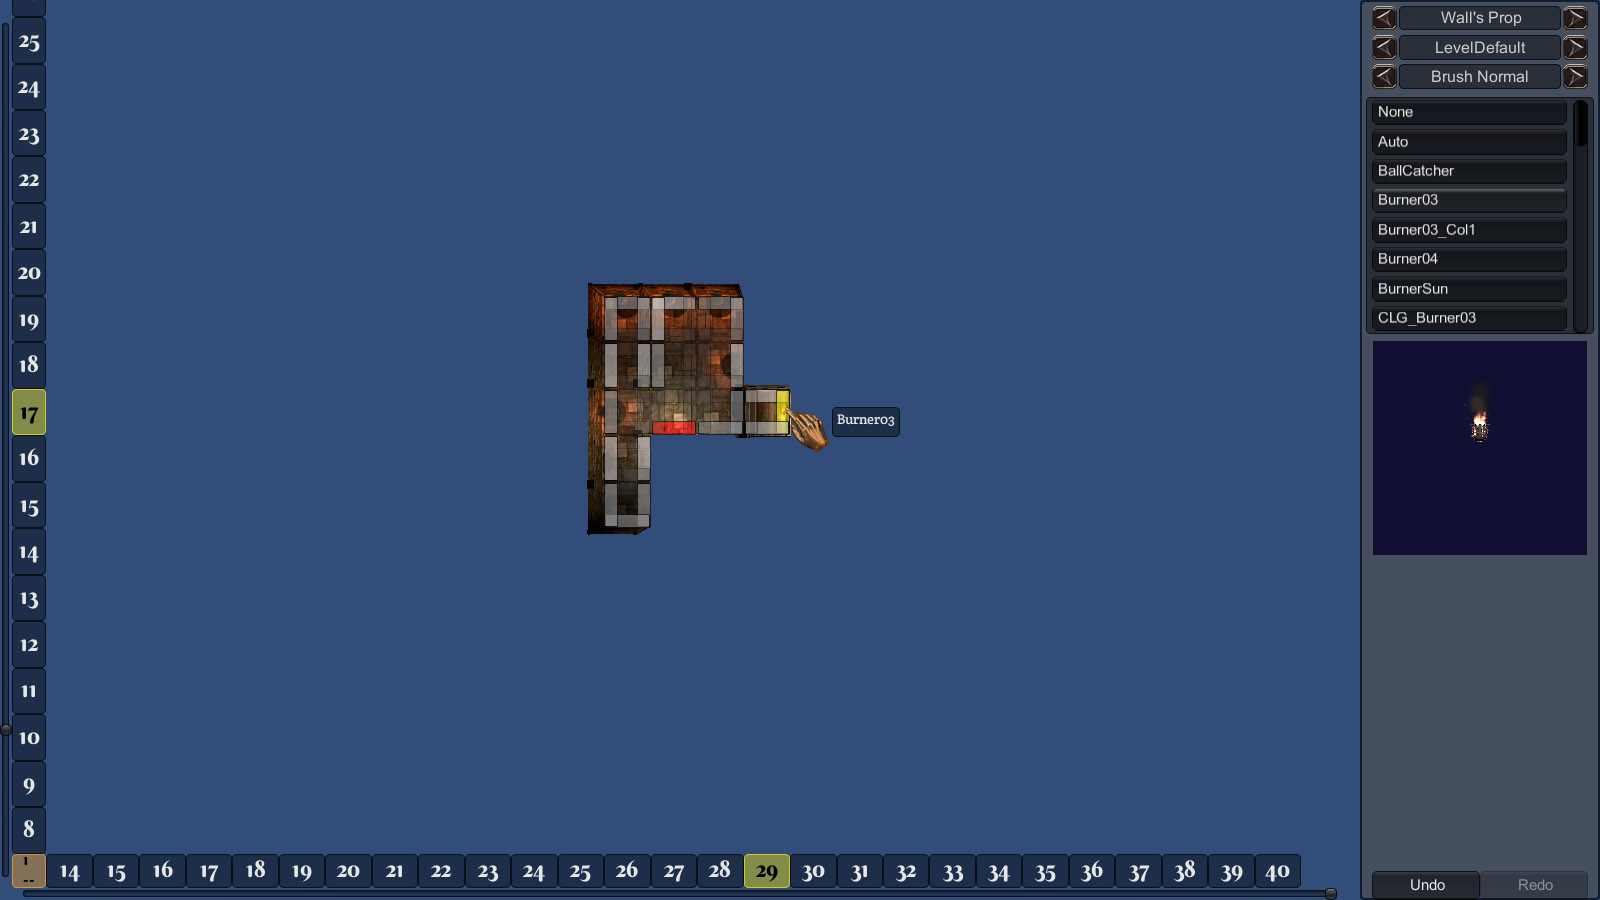
Here you can put all the props on the walls.
Props whose name starts by "Lock_" will require you to select a Key in the Item tab to trigger them.
Props whose name starts by "Switch" are triggers. When you place one, you'll be asked to select its target(s). More info about this in the Triggers & Targets section.
Props whose name starts by "Holder_" can hold an item and trigger when they do. Holders will hold all weapons of the same type of the weapon that makes them trigger.
Props whose name starts by "TZ_" are trigger zone. See Wall Trigger Zone for details.
Field Tab :
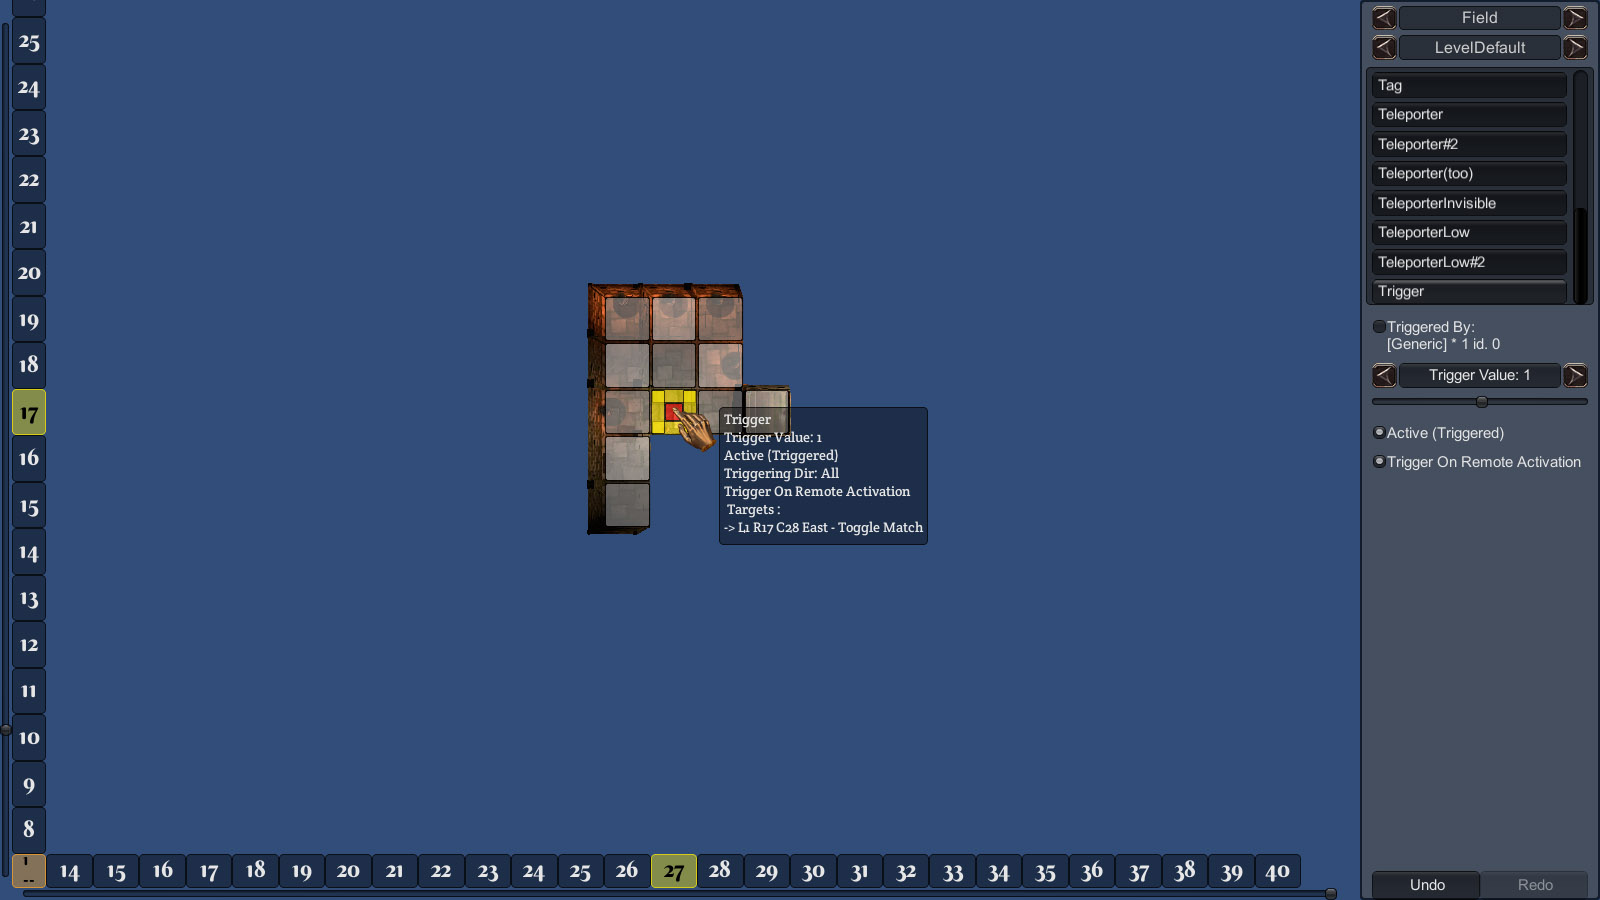
Most fields can be triggered and thus have a "Trigger Value".
Bridge :
The Bridge will use the floor selected in the Floor tab and put it at the specified "Height". Use "PitAo", "PitSa", "Grid" or "StairBridge" as floors (other floors can't be seen from under).
If the floor can be triggered (ie: it's "PitSa"), triggering the Bridge field will close the pit. If you want the trap door to be closed at start, assign the bridge twice.
Dialog :
Specify the Dialog file (it should be in the folder "MyMod/Dialog" ; see the Modding SDK for more details and examples).
Effect :
An Effect field will show a special FX and apply an ability of your choice when the party or mobs enter it.
The specified Level will be set to the Ability variable "PowLvl" (see Ability.ini in the Modding SDK). Usually, higher level means stronger effect.
A triggered Effect is turned off.
ForceField* :
The Force Fields prevent the Party, Mobs and/or items to pass.
The fields' differences are purely visual. The convention in the Dungeon Guardians Dungeon is :
- Pink : blocks everything
- Purple : blocks everything except Items
- Red : blocks only the Party
You're not forced to follow this convention though.
A triggered Force Field is turned off.
Generator :
Generators create Items or Mobs for a specified numbers of times, at a defined rate.
Set the wanted Item or Mob in the Item or Mob tab.
If "Max Generated" is not 0, then the Generator will be disabled once it will have generated this number of entities (so if you set this to 4, and generate 2 Mobs per tick, then it'll tick only 2 times, not 4 times). If you want to reset it to make it work again, use the "Always Activate" switch behavior.
If "Max Alive" is not 0, then the Generator will pause when there's this number of entities alive. Items will be always alive except for consumables that "die" when used.
"Delay" specifies the time to wait between 2 generation ticks.
"Delay at Start" will make the generator wait for the delay after it has been activated before generating its 1st entity.
"Only When Not Visible" will prevent the generator to generate anything as long as it's in the rendering zone (which extends to a couple of cells in the back of the Party).
A triggered Generator is turned on.
Lift :
Select the "Lift" in the Floor tab when you want to create a lift.
You can specify how many stops it has. Each stop height must be entered, and it's relative to the lift starting height.
Setting the trigger value of the lift to 0 will bring it to its Stop #0 ; setting it to 1 to bring to its Stop #1, and so on.
Tag :
The Tag field contains a special text value that is used to give hint to the game engine :
- SpawnLoot : will spawn the Targeted Loot ; it's required to put one at start of the dungeon, because there's a bug preventing the loot to spawn correctly in some rare cases ; the loot will be spawned anyway on loading a saved game
- NoLevelSave : prevents the Auto Save when reaching a new level ; it's useful in case the Party can reach a little zone in a new level but still can't explore it because the real main entrance is somewhere else
Teleporter* :
When you create a Teleporter, you'll be asked to set its target.
Teleporters can selectively teleport the Party, Mobs and/or Items.
A triggered Teleporter is turned on.
Trigger :
Field that will trigger its target(s) when the Party, Mobs and/or Items enter it.
When you place one, you'll be asked to select its target(s). More info about this in the Triggers & Targets section.
If you want it to be triggered by only a specific item, set it in the Item tab, and then check "Triggered by".
A triggered Trigger field is turned on. If it's off, it means it won't trigger its target(s) if something enters it.
If "Trigger on Remote Activation" is checked, then triggering the Trigger field will not only turn it on, but it will also trigger its target(s).
A Trigger field targetted by "Timed Switch", "Timed Inverted Switch" and all "Cancel *" will always trigger its target(s), even when the Trigger field is currently disabled.
Mob Tab :
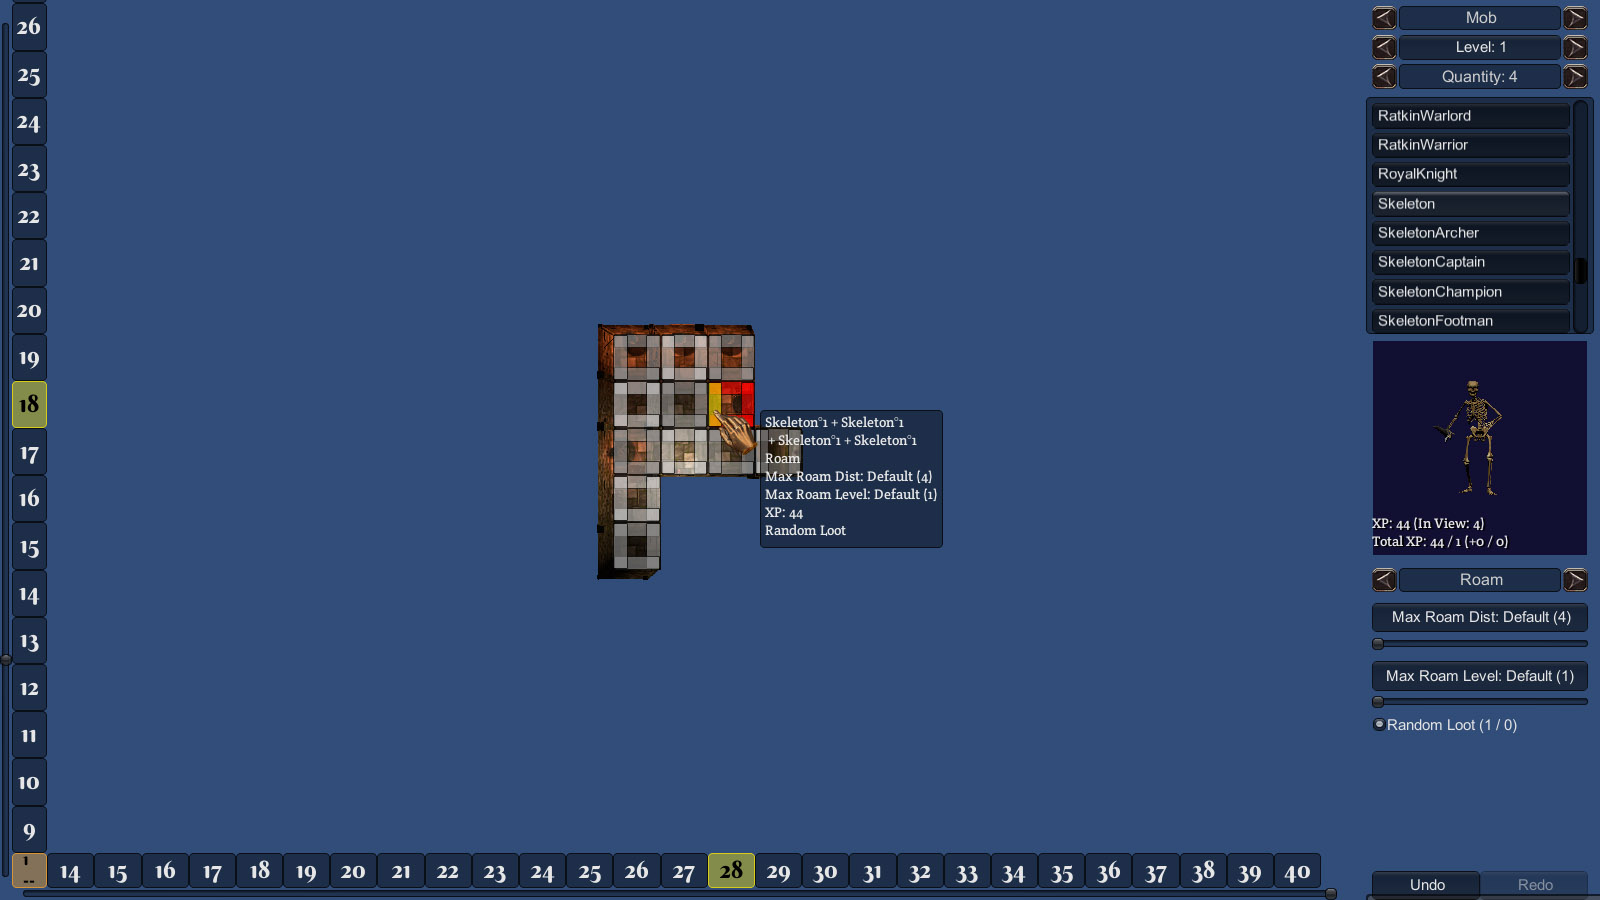
Here you can set all the Mobs ( = creatures / enemies).
Set their level in the Level bar, and their number in the Quantity bar.
If you set the Quantity bar to 0, you can place mob 1 by 1 in the desired corner (right-click to delete existing ones), and thus can put different kinds of mob in the same MobGroup.
In the Mob 3D View, "In View" is followed by the number of copies of the selected Mob in view (so if you zoom out, you can easily know how much of these mobs you have in the current level).
Total XP shows the XP for all the Mobs in the current level whose level matches or is under the level set in the Level bar, followed by the number of MobGroups (ie: 4 mobs in 1 group count for 1, not 4).
The 2 numbers in parenthesis show the total XP for mobs whose level is above the level set in the Level bar, and their number of MobGroups.
Uncheck "Random Loot" if you don't want this MobGroup to drop some Random Loot (the engine drops 1 loot every 2 MobGroups with this flag set, except for Elite and Boss who always drop Random Loot if they have this flag set).
You can define several Behaviors for the MobGroup :
- Guard : the group won't move until it aggros the Party
- Roam : the group will roam, but without going farther than the defined distance
- Patrol : the group will patrol on the selected path ; when you create a Path, you can change the Delay so once the group reaches the new point, it'll loop back to a previous point in the path and thus never stops patrolling
- Attack : the group will attack the Party right away (note: Mobs can't track the Party if it's too far ; they can only find the Party if it's close enough and/or if the path to it is relatively straight)
- Flee : the group will flee the Party ; ie: try to run in the opposite direction of the Party
- Sleep : the group will sleep till the Party attack it or walk next to it ; note: only some mobs have a sleep animation
- Ambush : the group won't move until the Party walk right next to it (ie: it ignores the AggroDst of Mobs.ini)
Note : most Bosses can be put in a MobGroup of 4, but all Bosses should be used alone (except if you create your own boss and design them to be used with more than one at once).
"Trigger On Aggro", "On Death" and "On Battle" let you define trigger targets when the MobGroup aggros the Party, when it dies, and when an ability calls the "Trigger: Battle" effect.
Important advice : always have your Bosses (and other Mobs) activate Trigger Fields that trigger other stuff, instead of triggering that other stuff directly ; this makes it possible to update the boss fights without forcing your users to restart a game to get the changes.
Item Tab :
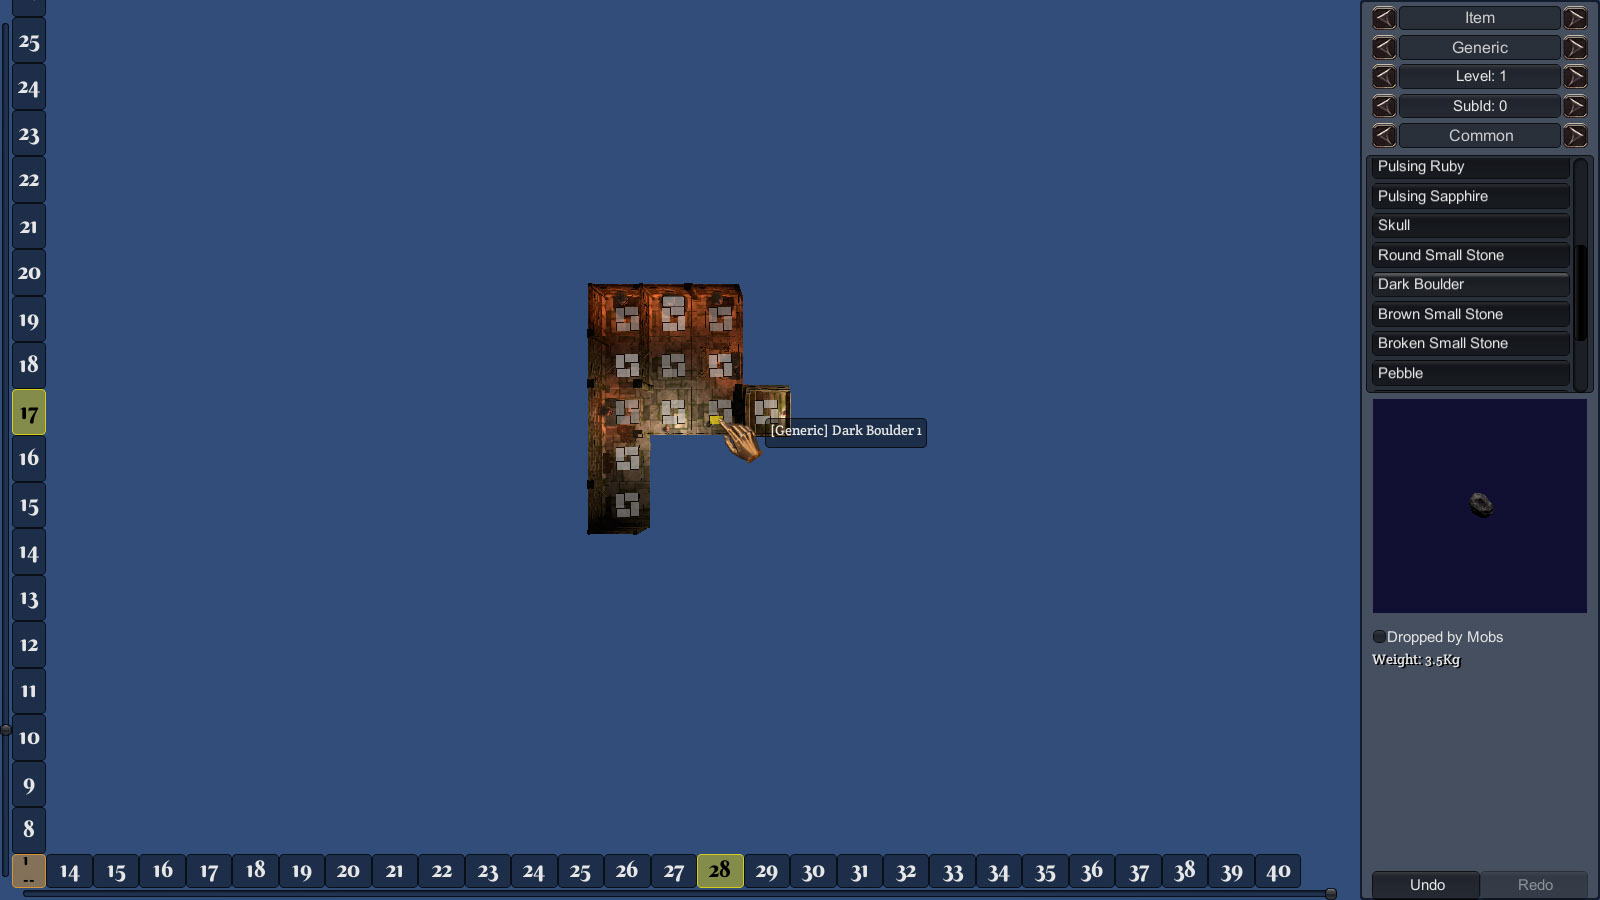
The Item tab lets you put all the items in your Dungeon.
The 2nd bar lets you choose the type of item.
"Targeted Random" type is for random loot crafted for each Party Toon. "Toon 1" is the Tank, "Toon 2" is the Healer, and Toons 3 & 4 are the damage dealers.
You'll need "Projectile" type only when creating Generator fields.
For all other types, check "Dropped by Mobs" to make the mobs drop the specified items when they die.
"SubId" is useful when you need to make a specific item to activate a trigger. So for example you have 2 Iron Keys : one will have a SubId of 1, and the other one 2, so your 1st Iron Lock will be triggered by the Iron Key SubId 1 and the 2nd Iron Lock by the Iron Key SubId 2.
Warning : SubId will be always reset to 0 for Enchanted items, so use a SubId different of 0 only for items without any enchantment.
Edit Cells Tab :
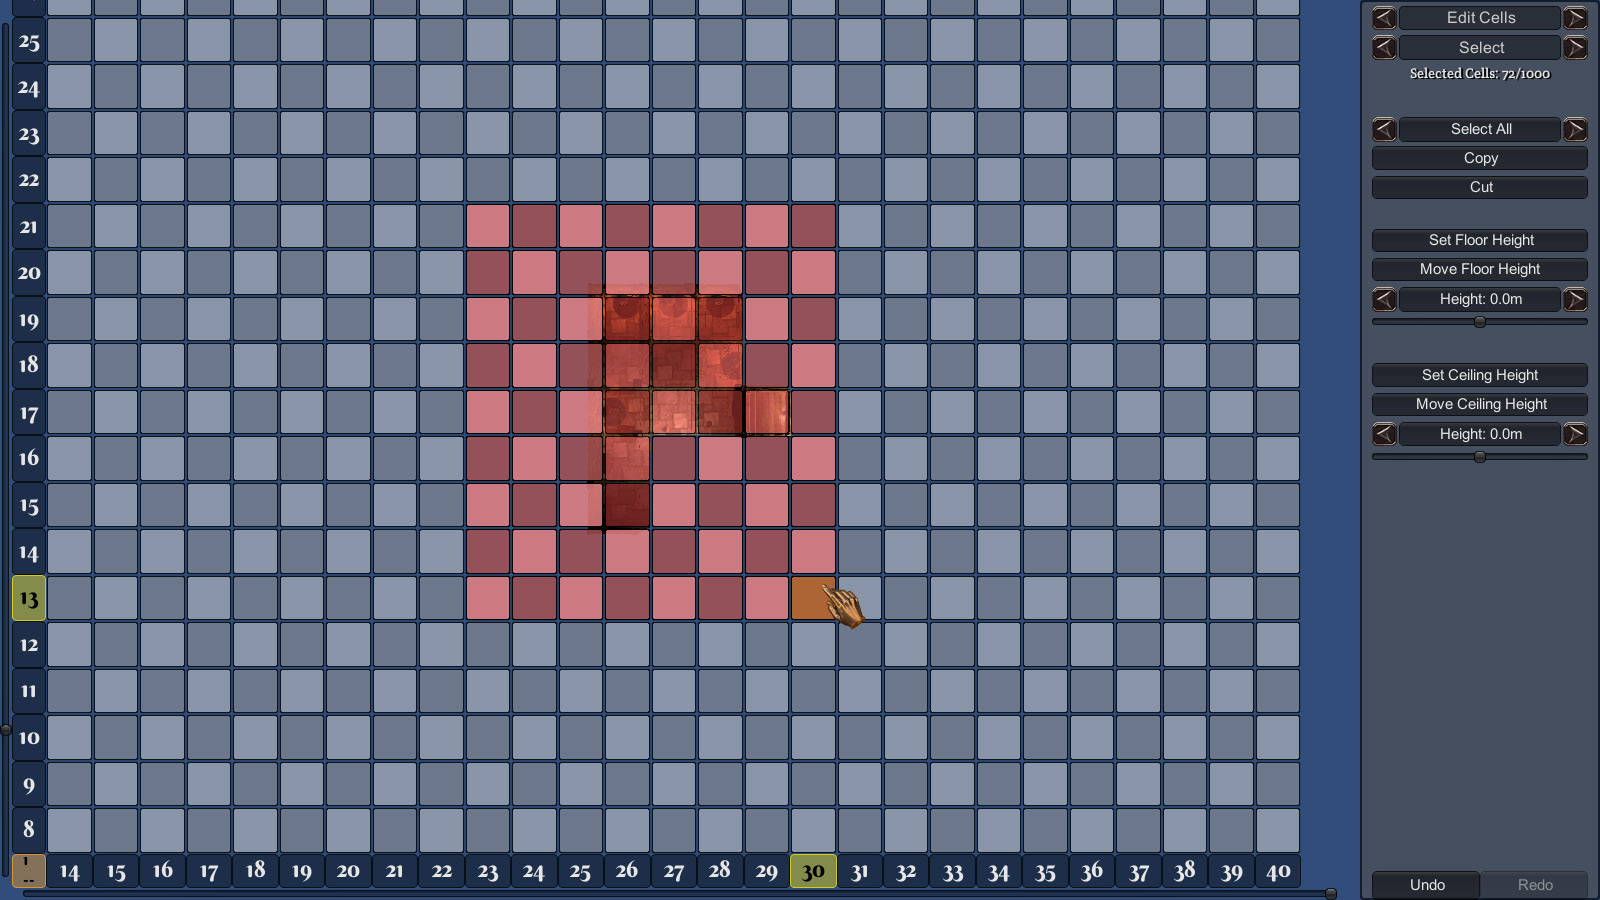
The Edit Cells tab lets you copy or cut and then paste the cells.
You can also select them and change their floor or ceiling heights.
Hold Shift to add cells to the current selection, and Alt to remove cells.
Operations can be undone only for the last 1000 cells.
Level Tab :
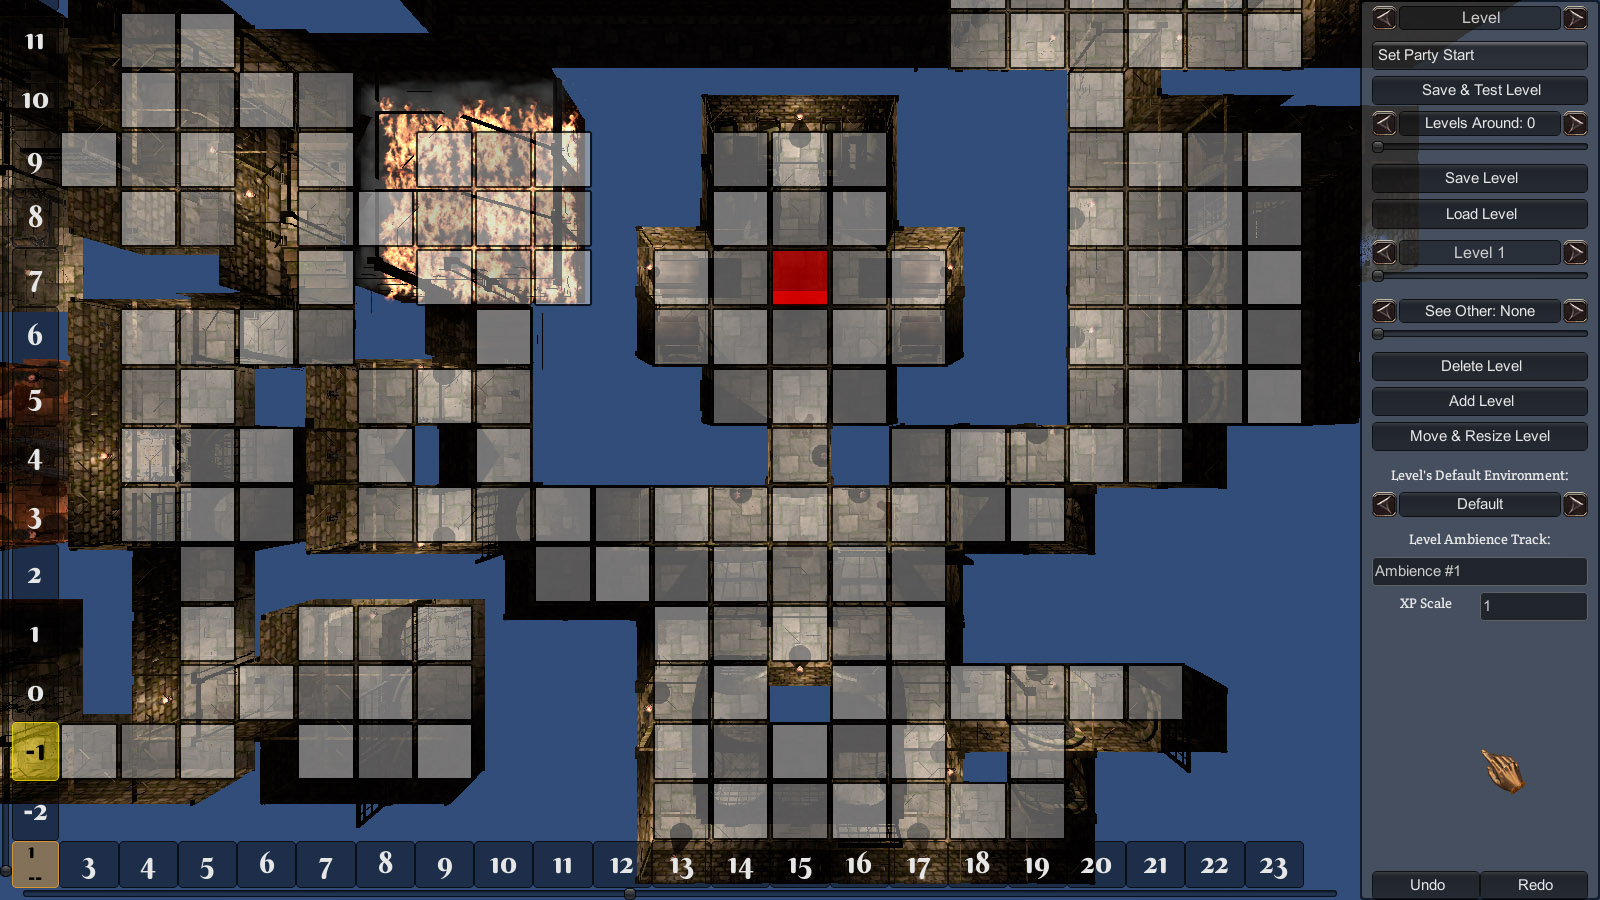
The Level tab is for create & delete levels, as well as for modify general level settings.
Clicking a direction in a cell will set the Party Start for that level. If this is also the Dungeon Party Start it'll be shown in red, else it'll be shown in blue.
"Save & Test Level" is equivalent of the F8 Key. If you have more than 1 Level in your Dungeon, the "Levels Around" value will let you define how much levels around the current level will be loaded when testing it. The fewer levels to load, the faster ; but in some cases, you might need to test the connection between 2 levels.
In "Move & Resize Level", you can also change its base height. By default, the editor will assign a base height of "-9 x (LevelNum - 1)" but you may need to lay your levels in a different order.
"Level's Default Environment" lets you change the environment used when you select "LevelDefault" in the different element tabs. Applying a different environment will save & reload your current level.
"Level Ambience Track" lets you define the music track to play. The built-in ambience tracks are :
- Ambience #1
- Ambience #2
- Ambience #3
- Ambience #4
You can easily add your own tracks ; check the Modding SDK for details.
"XP Scale" lets you scale the XP gained from all mobs spawned in this level, which allows you to create smaller or bigger levels, with more or less enemies, while still leveling at the rate of 1 toon level per 1 dungeon level.
Toons need 2000 XP to reach Level 2, 3000 for Level 3, and so on.
Dungeon Tab :
You can set the Dungeon Party Start by clicking a direction on a cell.
"Version" lets you define a version for your Dungeon. If you set it to a bigger number, and then add items & mobs, they'll be spawned when a player loads a saved game which was done with an older version of your Dungeon. ie: this lets you patch your Dungeon if you had forgotten to put some items & mobs in it. All other elements (floors, walls, ...) are always updated when you change them in your Dungeon, so there's no need to change the version number if you want to change them. Warning: this means if you remove an existing cell and a player had his party standing in it, then it won't be possible to load his saved game anymore.
"Save & Test Dungeon" will load the entire dungeon, unlike "Save & Test Level" (or F8) which loads only the current Level (and optionally a few levels around).
"Boost Light on Party" raises the light on the Party when testing the Dungeon, and the light on the camera in the 3D view (activated by clicking the middle mouse button). You can toggle it by left-clicking in the 3D view.
"Boost Ambient Light" raises the ambient light strength, which helps to see something in the Dungeon if you still haven't put any light in it. You can toggle it by right-clicking in the 3D view.
If you run the Steam version of the game, you'll have the "Steam Workshop" button to easily publish your Dungeon in the Workshop. In there, "Auto-Screenshot" will create a screenshot by placing the camera at the Dungeon Party Start, and "From Last Camera" will create a screenshot using the last camera position done from the 3D view. You can also create your own screenshot and put it in your Dungeon folder with the name "Preview.jpg".
Triggers & Targets :

Every time you place an element that can trigger targets, the above screen will be shown, asking you to select the target(s). Such elements are called "Switch".
Targets can be : doors, trap doors, fields, mobs and switches.
Click any target to assign the current selected switch behavior to it. Click it again to remove the behavior.
Each target has a current value, and a trigger value. At game start, the current value with be 0 or the trigger value, depending if the target starts untriggered or triggered.
So each target can have 2 states : triggered and untriggered. When the current value changes, if it changes the state, then the target will physically change as well ; eg: a door will close or open.
If the current value changes but the state doesn't change, then nothing happens.
Each switch can have an unlimited number of targets, in the whole dungeon, not only in the current level.
Some switches have only an activate even (eg: a button) ; some other switches have both an activate and deactivate event (eg: a plate pressed down, and then released ; entering a trigger field and then leaving).
The 1st bar on top right lets you select the switch behavior :
- add : add the defined value to the target's current value ; on deactivate event, subtract the defined value
- Set To 0 (untriggered) : set the target's current value to 0
- Trigger : set the target's current value to its trigger value ; note : if the current value is already the trigger value, nothing will happen
- Toggle Match : the target's current value will be set to its trigger value on activate event (eg: plate pressed down) and to 0 on deactivate event (eg: plate released)
- Toggle Always : the target's current value will be set to its trigger value if it's not already, else it'll be set to 0
- Set If To : if the target's current value is equal to Var1, then it'll be set to Var2
- Set If To Else Reset : if the target's current value is equal to Var1, then it'll be set to Var2, else it'll be set to 0
- Timed Switch : the targeted switch will send an activate event to all its targets ; only once if the delay is set to 0 ; if Activate is set to "Repeat" it will forever sent the activate event at the frequency defined by Delay, till another switch turn it off ; if Activate is set to a number, it'll send the activate event the specified number of times at the frequency defined by Delay, and then stops by itself (it still can be stopped earlier by another switch, though) ; if the targeted switch is already in repetition, nothing will happen
- Timed Invert Switch : same than "Timed Switch" except the behaviors of add, Set To 0, Trigger, Toggle Match, Toggle Always, Set If To, Set If To Else Reset, Always Activate, Cycle and Add Clamp will be inverted
- Cancel If Switch Is : if the targeted switch's current value is equal to Var1 then its repetition process will be ended
- Cancel Delayed Switch : stop the repetition of the targeted switches
- Cancel Delayed All : stop the repetition of the targeted switches, as well as all other delayed actions
- Set Mob Behavior : set the behavior of the targeted MobGroup
- Always Activate : set the target's current value to its trigger value ; even if the current value was already set to its trigger value, the activate event will propagate ; this is useful if you have a Trigger Field with a list of targets that you want to activate several times in a row ; it's also useful to reset a Generator which has reached its Max Generated limit
- Cycle : increases the target's current value by 1 ; if it gets above Var2, the current value is then set to Var1
- Teleport to Path : the targeted MobGroup will be teleported to the next point in the selected path
- Apply Ability : applies the selected Ability to each Mob of the targeted MobGroup
- SetTo : set the target's current value to Var1
- Add Clamp : clamps the target's current value to [0; Var2], then add Var1 to it, then clamps it again to [0; Var2] ; on deactivate event, subtract Var1
If no specific behavior is indicated for the deactivate event, then the behavior will be identical to the activate event one.
The 2nd bar defines the constraints. You can choose the behavior to be applied only on activate events, or only on deactivate event ; and also only once.
The 3rd bar lets you delay the switch behavior effect by the desired amount.
For switch behaviors that target a MobGroup, you can check "Track Mob" ; in this case, the game engine will look for the MobGroup that spawned at that location ; else, it'll target the MobGroup currently at that location.
Note : if you'd like to get extra switch behaviors, request them here => http://steamcommunity.com/app/409450/discussions/2/ ; I'll try to do them if they're easy :-)